If you have been exploring web development or mobile app development, you have almost certainly encountered both React JS vs React Native as topics — and if you are a beginner, you have probably also encountered the confusion about whether they are the same thing, closely related things, or entirely different tools that just happen to share a name. This complete React beginner guide answers that question definitively and practically — explaining the difference between React and React Native across every dimension that matters for a developer choosing where to invest their learning time and effort. Whether you are looking for a React tutorial entry point into frontend development, working through a React Native tutorial, or exploring React Native for beginners as a path into cross-platform mobile application development, understanding the distinction clearly before you start learning saves weeks of confusion and misdirected effort. This React beginner guide covers what each framework is, how they relate to each other, where they differ in syntax and component model, what rendering environments they target, and — most practically — how to decide which one to learn first based on your specific goals as a developer. Both are built on the same JavaScript framework foundations and share more DNA than most comparison articles acknowledge — but the differences that exist are consequential, and every beginner should understand them clearly before writing their first line of React code.
Related Article:
Top BTech Colleges in India 2026
Table of Contents
- What Are React JS and React Native?
- What They Share — The Common React DNA
- Step 1 — Rendering: DOM vs Native Components
- Step 2 — Syntax & Components: JSX vs Native Elements
- Step 3 — Styling: CSS vs StyleSheet
- Step 4 — Navigation: React Router vs React Navigation
- Step 5 — Development Environment & Tooling
- Step 6 — Ecosystem, Libraries & Platform Access
- Step 7 — Which Should You Learn First?
- Conclusion
What Are React JS and React Native?
Step 1: React JS — The Web UI Library
React JS — commonly just called React — is an open-source JavaScript framework library created by Meta (Facebook) for building user interfaces on the web. When developers refer to a React tutorial without qualification, they almost always mean React JS. React builds web applications by managing the DOM (Document Object Model) — the browser's representation of the HTML structure of a page — through a concept called the Virtual DOM, which enables efficient updates to the UI when application state changes. React JS is a frontend development tool: it runs in browsers, produces HTML, CSS, and JavaScript output, and enables the creation of interactive web applications — from simple single-page apps to complex enterprise web platforms. React JS is arguably the most widely used JavaScript framework in production web development globally, with a massive ecosystem of libraries, tools, and learning resources.
Step 2: React Native — The Mobile App Framework
React Native is a separate framework — also created by Meta — that uses React's programming model and component architecture to build native mobile applications for iOS and Android. The critical distinction that every React Native for beginners guide must make clearly: React Native does not render to a browser DOM. Instead, it communicates with native iOS and Android platform APIs to render actual native UI components — the same components that native iOS (Swift/Objective-C) and Android (Kotlin/Java) applications use. This means a React Native button is not an HTML element styled to look like a button — it is an actual native iOS or Android button control, rendered by the platform's own UI framework. React Native enables cross-platform mobile app development with a single JavaScript codebase — a significant advantage over maintaining separate native codebases for each platform.
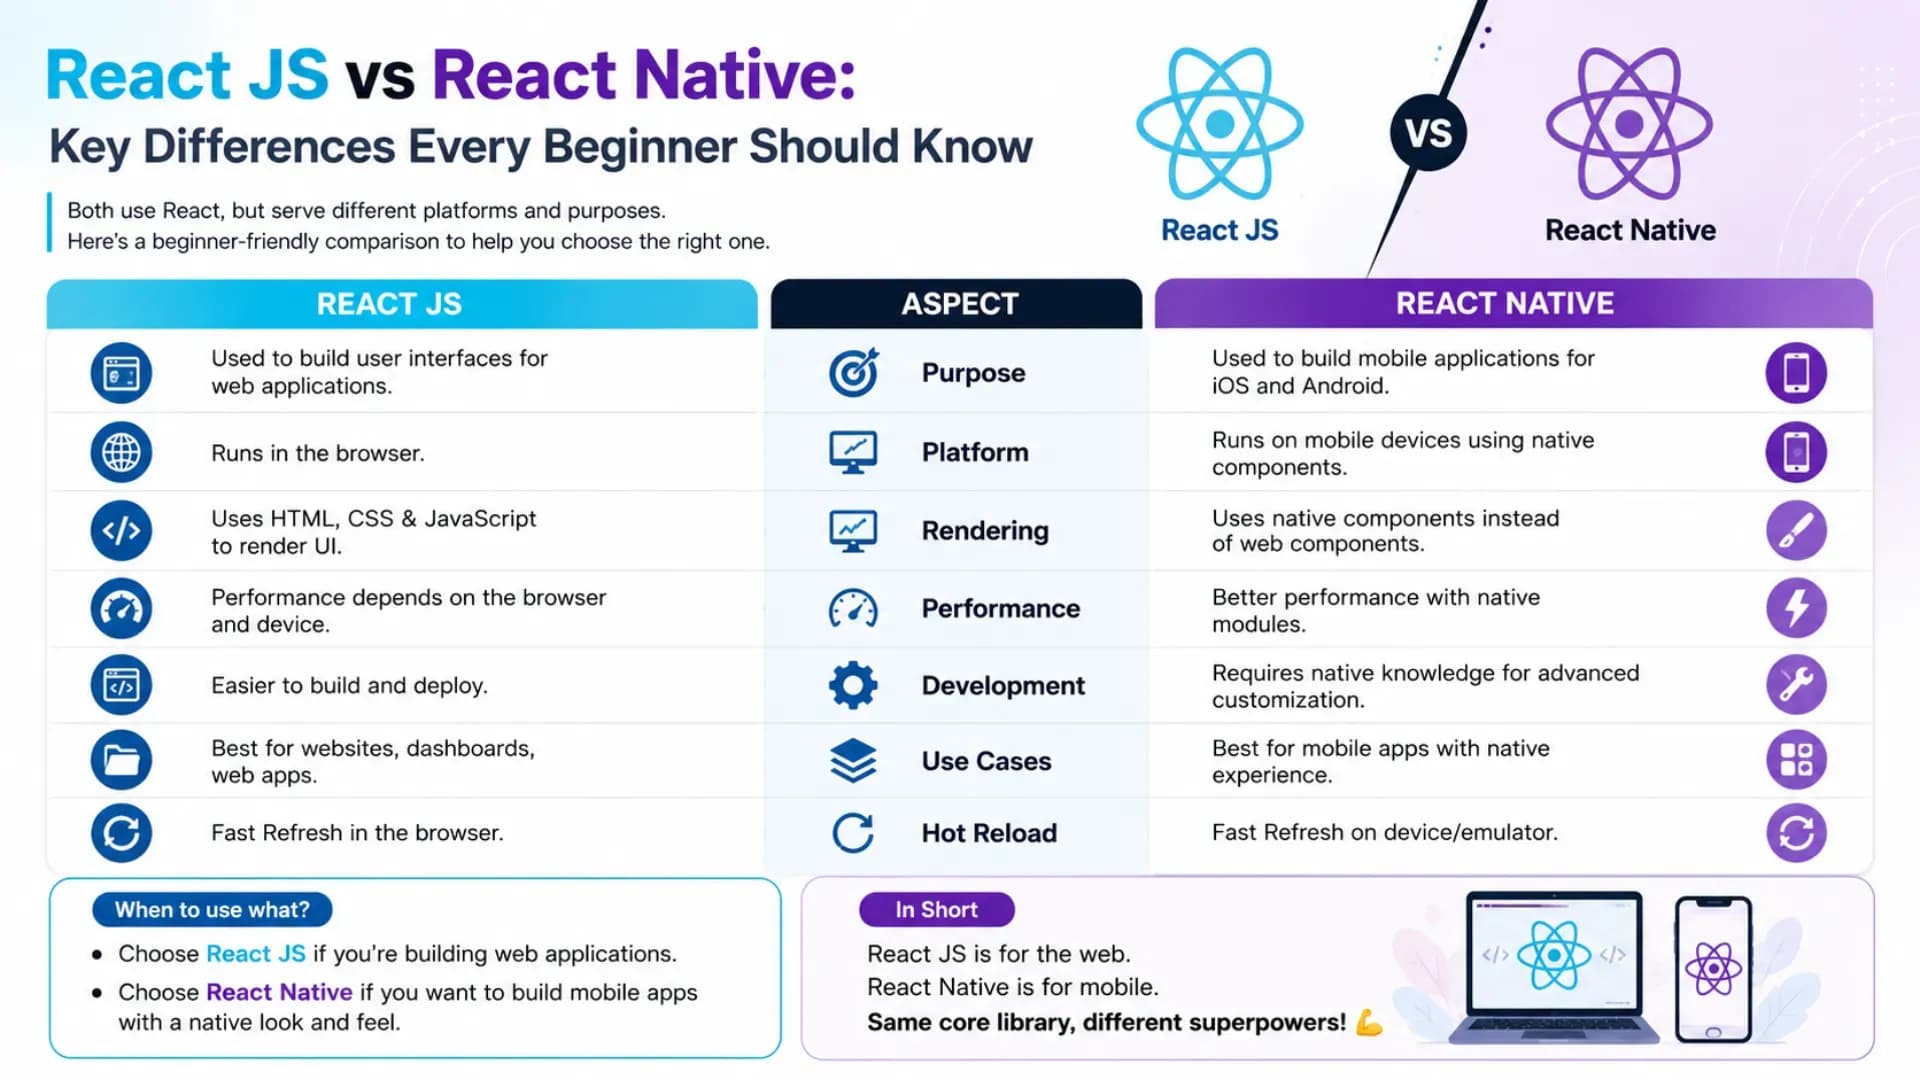
One-Line Summary: React JS builds web applications that run in browsers. React Native builds mobile applications that run natively on iOS and Android. Same mental model, different rendering targets, different component sets.
Also Read:
Top MTech Colleges in India 2026
What They Share — The Common React DNA
Before examining the difference between React and React Native, it is important to establish what they genuinely share — because the commonality is significant and is why learning one makes learning the other considerably easier.
- Component-based architecture: Both React JS and React Native are built around the same component model — reusable, composable pieces of UI logic that manage their own state and receive data through props. A functional component in React JS and one in React Native follow identical structural patterns
- JSX syntax: Both use JSX (JavaScript XML) — the syntax extension that allows you to write HTML-like markup within JavaScript. The JSX looks nearly identical in both frameworks; it is the underlying elements that differ (HTML tags in React JS vs native components in React Native)
- Hooks: Both React JS and React Native use the same React Hooks API —
useState,useEffect,useContext,useRef,useMemo,useCallback, and custom hooks all work identically in both frameworks - State management: State management approaches — whether using React's built-in
useState, the Context API, Redux, Zustand, or other libraries — are either shared directly or conceptually equivalent between the two frameworks - JavaScript and TypeScript: Both are JavaScript frameworks and both have strong TypeScript support — code written for one follows the same language rules as code for the other
- Unidirectional data flow: Both enforce React's fundamental data flow model — data flows down through component trees via props, and state changes trigger re-renders in both frameworks identically
This shared foundation means that a developer who has learned React JS thoroughly can typically become productive in React Native within a few weeks — and vice versa. The difference between React and React Native is not a fundamental paradigm difference; it is a surface-layer difference in what components you use, how styling works, and what platform APIs you access.
Step 1 — Rendering: DOM vs Native Components
The most fundamental difference between React and React Native is how each framework renders UI — and understanding this difference explains most of the other differences that follow.
React JS Rendering
React JS renders to the browser DOM. When you write a React component, it ultimately produces HTML elements that the browser renders using standard web technologies. React manages a Virtual DOM — a lightweight in-memory representation of the actual DOM — and efficiently synchronises changes between the virtual and actual DOM to minimise expensive browser repaints. The output of a React JS application is a web page that any browser can render.
// React JS — renders to browser DOM
function WebComponent() {
  return (
    <div className="container">
      <h1>Hello from the Web</h1>
      <button onClick={() => alert('clicked')}>
        Click Me
      </button>
    </div>
  );
}
// Output: actual HTML div, h1, button elements in browser DOM
React Native Rendering
React Native does not render to HTML or a browser DOM. Instead, it uses a JavaScript bridge (or the newer JSI — JavaScript Interface architecture) to communicate with native platform APIs. When React Native renders a View component, it instructs iOS to render a UIView and Android to render an android.view.View — actual native UI elements, not HTML. This is why React Native apps look and feel genuinely native on each platform — they are using the platform's actual UI components.
// React Native — renders to native platform components
import { View, Text, TouchableOpacity, Alert } from 'react-native';

function NativeComponent() {
  return (
    <View style={styles.container}>
      <Text>Hello from Native</Text>
      <TouchableOpacity onPress={() => Alert.alert('pressed')}>
        <Text>Press Me</Text>
      </TouchableOpacity>
    </View>
  );
}
// Output: actual UIView/UILabel on iOS, android.view.View/TextView on Android| Aspect | React JS | React Native |
|---|---|---|
| Render target | Browser DOM | iOS / Android native APIs |
| Output | HTML + CSS | Native platform UI components |
| Where it runs | Any web browser | iOS and Android devices |
| Performance | Virtual DOM diffing | JS-to-native bridge / JSI |
Stop Stressing. Start Applying.
Skip the chaos of filling endless forms. Apply to your dream colleges in one go through the College Nirnay Common Application Form — built for every student navigating India's competitive education landscape.
Fill the Common Application Form →✓ Free to apply · ✓ Takes under 5 minutes · ✓ Trusted by thousands of students
Step 2 — Syntax & Components: JSX vs Native Elements
This is the difference that beginners notice most immediately when moving between a React tutorial and a React Native for beginners tutorial — the component names are different, even though the JSX structure around them is identical.
HTML Elements in React JS vs Native Components in React Native
/* ===== REACT JS — uses HTML elements ===== */
function ReactWebCard({ title, description }) {
  return (
    <div className="card">
      <h2>{title}</h2>
      <p>{description}</p>
      <img src="/image.png" alt="card image" />
      <input type="text" placeholder="Enter text" />
      <button onClick={handleClick}>Learn More</button>
      <a href="/details">View Details</a>
    </div>
  );
}
/* ===== REACT NATIVE — uses native components ===== */
import { View, Text, Image, TextInput, TouchableOpacity } from 'react-native';
function ReactNativeCard({ title, description }) {
return (
<View style={styles.card}>
<Text style={styles.title}>{title}</Text>
<Text>{description}</Text>
<Image source={require('./image.png')} style={styles.image} />
<TextInput placeholder="Enter text" style={styles.input} />
<TouchableOpacity onPress={handlePress} style={styles.button}>
<Text>Learn More</Text>
</TouchableOpacity>
{/* No <a> tag — navigation handled differently */}
</View>
);
}The mapping between React JS and React Native elements:
| React JS (HTML) | React Native Equivalent |
|---|---|
| <div> | <View> |
| <p>, <h1>, <span> | <Text> |
| <img> | <Image> |
| <input> | <TextInput> |
| <button> | <TouchableOpacity> / <Pressable> |
| <ul> / <li> | <FlatList> / <ScrollView> |
| <a> | Navigation library (no native equivalent) |
Step 3 — Styling: CSS vs StyleSheet
Styling is one of the most practically significant differences in the React JS vs React Native comparison — and one of the most frequent adjustment points for developers moving from web to mobile. React JS uses standard CSS (or CSS preprocessors, CSS Modules, or CSS-in-JS libraries like styled-components). React Native has no CSS — it uses a JavaScript object-based StyleSheet API that resembles CSS but has important differences.
/* ===== REACT JS — standard CSS ===== */
/* styles.css */
.container {
  display: flex;
  flex-direction: column;
  align-items: center;
  padding: 20px;
  background-color: #f5f5f5;
  border-radius: 8px;
  box-shadow: 0 2px 4px rgba(0,0,0,0.1);
}

.title {
  font-size: 24px;
  font-weight: bold;
  color: #333;
  margin-bottom: 10px;  /* CSS uses hyphenated property names */
}

/* In component: */
<div className="container">
  <h1 className="title">Hello</h1>
</div>
// ===== REACT NATIVE — StyleSheet API =====
import { StyleSheet } from 'react-native';
const styles = StyleSheet.create({
container: {
flex: 1,
flexDirection: 'column',
alignItems: 'center',
padding: 20,
backgroundColor: '#f5f5f5',
borderRadius: 8,
// No box-shadow — use elevation (Android) or shadow props (iOS)
elevation: 4, // Android shadow
shadowColor: '#000', // iOS shadow
shadowOffset: { width: 0, height: 2 }, // iOS shadow
shadowOpacity: 0.1, // iOS shadow
},
title: {
fontSize: 24,
fontWeight: 'bold', // camelCase, not hyphenated
color: '#333',
marginBottom: 10, // numbers, not strings — no 'px'
},
});
// In component:
<View style={styles.container}>
<Text style={styles.title}>Hello</Text>
</View>Key React Native StyleSheet rules every beginner must know:
- No CSS files — all styles are JavaScript objects with camelCase property names
- No units — dimensions are density-independent pixels by default; never write
'20px' - No CSS inheritance by default — text styles must be explicitly applied to every
<Text>component - Flexbox is the primary layout model — and React Native uses
flexDirection: 'column'as the default (unlike CSS where the default is row) - No
box-shadow— useelevationfor Android and individualshadow*props for iOS
Step 4 — Navigation: React Router vs React Navigation
Navigation is another area where the difference between React and React Native is significant in practice. React JS web apps use URL-based navigation — typically managed by React Router or similar libraries that map URLs to components. React Native apps have no browser URL bar — navigation is handled programmatically through a stack, tab, or drawer navigator pattern, typically using React Navigation.
// ===== REACT JS — React Router (web navigation) =====
import { BrowserRouter, Routes, Route, Link } from 'react-router-dom';

function App() {
  return (
    <BrowserRouter>
      <nav>
        <Link to="/">Home</Link>
        <Link to="/about">About</Link>
      </nav>
      <Routes>
        <Route path="/" element={<Home />} />
        <Route path="/about" element={<About />} />
        <Route path="/user/:id" element={<UserProfile />} />
      </Routes>
    </BrowserRouter>
  );
}
// Navigation changes the browser URL — history/back button works natively
// ===== REACT NATIVE — React Navigation (mobile navigation) =====
import { NavigationContainer } from '@react-navigation/native';
import { createNativeStackNavigator } from '@react-navigation/native-stack';
const Stack = createNativeStackNavigator();
function App() {
return (
<NavigationContainer>
<Stack.Navigator>
<Stack.Screen name="Home" component={HomeScreen} />
<Stack.Screen name="About" component={AboutScreen} />
<Stack.Screen name="UserProfile" component={UserProfileScreen} />
</Stack.Navigator>
</NavigationContainer>
);
}
// Navigate programmatically using navigation.navigate()
function HomeScreen({ navigation }) {
return (
<TouchableOpacity onPress={() => navigation.navigate('About')}>
<Text>Go to About</Text>
</TouchableOpacity>
);
}CHECK OUT:
Top Colleges in Ranchi 2026
Step 5 — Development Environment & Tooling
The development setup experience is noticeably different between React JS and React Native — and for beginners, this difference can be a meaningful friction point. Understanding it in advance reduces the setup frustration that many newcomers encounter.
React JS Setup — Simple and Fast
A React tutorial for web typically starts with minimal setup. By contrast, any serious React Native tutorial will spend time on environment configuration before writing a single component. With tools like Vite or Create React App, you go from zero to a running development server in minutes. No special hardware requirements, no platform-specific tools, and the result runs immediately in any browser.
# Create a React JS project with Vite (recommended for beginners)
npm create vite@latest my-react-app -- --template react
cd my-react-app
npm install
npm run dev
# Opens in browser at localhost:5173 — that's it
React Native Setup — More Complex
React Native development requires more setup — especially for running on actual device simulators. The simplest path for React Native for beginners is Expo, which abstracts away most of the native tooling complexity.
# React Native with Expo (easiest path for beginners)
npx create-expo-app my-native-app
cd my-native-app
npx expo start
# Scan QR code with Expo Go app on your phone — or run in simulator

# React Native CLI (full native build capability — more complex setup)
# Requires: Node.js, Watchman, JDK 17, Android Studio (for Android),
# Xcode (for iOS — macOS only)
npx @react-native-community/cli@latest init MyNativeApp
cd MyNativeApp
npx react-native run-android   # OR
npx react-native run-ios       # macOS only
Beginner Tip: Start React Native with Expo, not the bare React Native CLI. Expo handles the complex native build tooling for you and lets you focus on learning React Native syntax and patterns — you can always eject to the full native CLI later when you need access to custom native modules.
Step 6 — Ecosystem, Libraries & Platform Access
The library ecosystems for React JS and React Native overlap significantly but have important divergences that shape the development experience and capabilities available in each.
Shared Libraries (Work in Both)
- State management: Redux Toolkit, Zustand, Jotai, React Query / TanStack Query
- Form handling: React Hook Form, Formik
- HTTP requests: Axios, the native
fetchAPI - Utility libraries: Lodash, date-fns, most pure JavaScript utilities
React JS Exclusive (Web-Only)
- UI component libraries: Material UI (MUI), Chakra UI, shadcn/ui, Ant Design, Tailwind CSS
- Animation: Framer Motion, React Spring (web versions)
- Routing: React Router, TanStack Router
- SSR/SSG frameworks: Next.js, Remix, Gatsby
- Browser APIs:
localStorage,sessionStorage,IndexedDB,Geolocation API,Web Notifications
React Native Exclusive (Mobile-Only)
- Navigation: React Navigation, Expo Router
- UI libraries: React Native Paper, NativeBase, Tamagui
- Native device access: Camera, GPS, Contacts, Accelerometer, Biometrics, Push Notifications, Bluetooth — through Expo modules or react-native community packages
- Animation: React Native Reanimated, Lottie React Native
- Performance: React Native Skia for high-performance 2D graphics
// Example: Accessing device camera (React Native only)
import * as ImagePicker from 'expo-image-picker';

async function pickImage() {
  const result = await ImagePicker.launchCameraAsync({
    mediaTypes: ImagePicker.MediaTypeOptions.Images,
    quality: 0.8,
  });

  if (!result.canceled) {
    console.log('Photo taken:', result.assets[0].uri);
  }
}
// This capability simply doesn't exist in React JS (web)
Step 7 — Which Should You Learn First?
This is the question that most React beginner guide articles answer too simplistically. The honest answer is: it depends on your goal — and the goal difference is more important than any framework preference.
Learn React JS First If:
- Your primary goal is web development — building websites, web apps, dashboards, or web-based SaaS products
- You are a complete beginner to both JavaScript and React — the browser-based development environment is simpler to set up and the feedback loop is faster
- You want to access the largest React job market — the vast majority of React job postings are for web development roles
- You are interested in full-stack development with Next.js or Remix — both are built on React JS
- You have CSS knowledge you want to leverage — web styling with Tailwind and CSS-in-JS is more accessible than React Native's StyleSheet system
Learn React Native First If:
- Your goal is specifically mobile app development — you want to build iOS and Android apps as your primary output
- You have some React JS experience already — React Native will be significantly easier after you know React's hooks and component model
- You want to target both iOS and Android without learning Swift/Kotlin — React Native's cross-platform capability is its core value proposition
- You are interested in building apps that require native device features — camera, GPS, push notifications, biometrics
The Most Common Recommended Path
For most beginners — start with React JS, then move to React Native. React JS has a gentler setup curve, the web browser is a more forgiving development environment, the ecosystem documentation is more mature, and the React fundamentals you learn (hooks, components, state, props, context, data fetching) transfer directly to React Native. Once you are comfortable building React JS web applications, learning React Native becomes a matter of learning the different component names, the StyleSheet system, and the navigation library — rather than learning React itself from scratch a second time.
Explore More
Conclusion
The React JS vs React Native comparison resolves clearly once you understand their respective targets: React JS is a web development and frontend development tool that renders to browser DOMs; React Native is a mobile app development framework that renders to native iOS and Android components. They share the same JavaScript framework foundation — components, JSX, hooks, state, props, and data flow — which is precisely what makes moving from one to the other so efficient compared to learning an entirely different stack.
For every beginner working through either a React tutorial, a React Native tutorial, or a React Native for beginners guide: the specific components you use (<div> vs <View>, CSS vs StyleSheet, React Router vs React Navigation) are the surface. The React mental model — thinking in components, managing state with hooks, composing UIs from reusable pieces — is what you are actually learning, and it transfers between both frameworks.
Start with React JS if your goal is web. Start with React Native (via Expo) if your goal is mobile apps. Either way, you are learning one of the most in-demand skill sets in modern software development — and the React beginner guide foundation you build in either framework will serve your career across both.